Airflow:
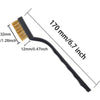
-It is important to make sure your burn pot and venting are clean. A build-up of carbon or ash in the burn pot or venting system can restrict airflow through the unit. Often the igniter is working fine, and this restriction in airflow is what causes issues with ignition. If these areas of the stove are clean and your stove will not ignite or there is a long delay during ignition you should inspect your door gasket, door latch, and burn pot ignitor cover. If the door does not make a tight seal, air can be drawn into the stove through this area instead of being pulled through the neck of the burn pot and across the ignitor.
Control Board Display:
-If your igniter light is not illuminated on the control board check the igniter toggle switch to make sure it is not in the "manual" position. The toggle switch MUST be in the auto position in order to allow the control board to send power to the element.
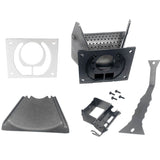
Check The Burn Pot:
-If the ignitor light is illuminated on your control board, the unit feeds fuel but the pellets do not ignite, open the door and *carefully* feel around the burn pot to see if you can sense any warmth. If you do not feel any warmth or see a visible glow it's likely that the ignitor has failed. If you feel warmth/heat around the burn pot it is possible that you have an airflow issue, build-up in the holes in the burn pot / around the ignitor, or you may have an issue with the ignitor cradle/ holder.
Additional Info:
If you are experiencing ignition issues, watch this video.
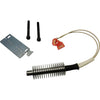
Click here to purchase the burn pot update kit.
It is advisable to ALWAYS replace your door gasket when you are replacing an igniter. A leaking door gasket is often a contributing factor to igniter failure.
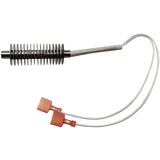
Troubleshooting Igniters:
Igniter failure can be verified on one of three ways. The easiest and most common way to see if the igniter is working is to start your stove or grill and visually look for the orange glow; however, some appliances do not have a visual way to do this, so you may have to physically feel around in the burn pot after the stove has been on for a few minutes to “feel” for heat being generated. If you can see the glow or can feel the heat from the igniter, chances are that the igniter is actually working. If this is the case, retry the startup process. Make sure your burn pot is seated correctly if it is removable. Make sure that your ash pan, door or hopper lid is closed as this will provide an airtight seal on the stove, which most igniters will require for proper ignition. If you still do not have any luck, give the stove a good cleaning, including the vent, and try again. If these attempts fail, further troubleshooting will be required, which leads us to the third method.
For this method, you will need a DMM (Digital Multi-Meter). Gain access to the igniter and remove it from the stove or insert. While you are taking the igniter out, verify that it is installed correctly with the correct mounting equipment, screws, etc.. With the igniter removed from the stove, you will need to look over the part to find the rated watts, it’s usually stamped on the metal somewhere. If you cannot find it, look on our website for the correct igniter; the information you are looking for will be under “technical specs”
If your Ohms reading is within 10%, more or less than the rating (46Ω +/- 10%), it’s good. If the igniter has a “contained short” or a short within itself and not grounding out, your Ohms reading will be very low...usually in the single digits. Generally, you cannot have a faulty igniter with too high of a resistance reading unless an igniter is installed that is way out of spec. An example of this would be your stove requires a 300W igniter but the stove has a 250W igniter installed. The reading in this scenario would be 52Ω. The reading would be correct to the igniter but would be the wrong value for the specified 300W igniter. That’s why it’s usually good to look at the part itself for the watts rating.