How to: Troubleshooting Your Englander Pellet Stove When it Won't Feed Pellets
Part 1: Your stove powers up, there are no error codes present but no pellets are coming down from the hopper.
When you start up your Englander pellet stove, a few things need to happen. The controller on the stove is looking at a few sensors to make sure the stove is safe to operate and when those signals are verified, power is sent to the upper auger and pellet begin to feed through the system. If there are no pellets coming down and there are pellets in the hopper begin with these troubleshooting techniques to solve the problem.
- Unplug the stove and remove the rear access panel.
- With your hand, lift up on the upper auger motor to see if it can move freely up and down. If it does not move freely it is jammed.
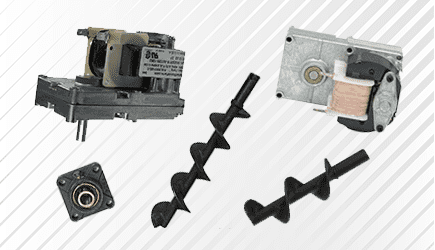
- Look into the hopper and see if you can see any obstruction stopping the auger from turning. The obstruction could be further into the feeder body but sometimes you can see something like a screw, nail or any other small foreign object. If you see something, the upper auger assembly needs to be removed, the foreign object needs to be removed and then reinstalled. If you cannot see a foreign object and the motor does not freely move, plug the unit in and press start. Check to see if the lower auger is turning in the burn pot. If the lower auger is not turning, the jam is between the two augers. This is the most common scenario. These auger motors have a life span of about 5-8 years. The lower auger, because it’s always on, usually quits first. When it fails, the upper auger keeps feeding and jams up the feeder. The upper feed assembly and the lower feed assembly will need to be removed. Visually inspect each feeder tube, top, and bottom. Remove all of the wood pellets, including the drop ramp from the top feed tube to the lower feed tube.
- If the lower auger is burnt out, the nylon casing around the coil will be yellow or brownish and the cellphone tape covering the coil will also be yellowish brown. Sometimes the coloring isn’t very noticeable but the copper wires of the coil will be very noticeable through the cellophane, almost like they are shrink wrapped; the cellophane is “tight”, exposing the copper wire texture. These are signs of a bad motor.
- Sometimes when a lower auger motor quits and a jam occurs, there can be a “burn back” from the burn pot into the feeder. When you remove the auger motor assemblies if the pivot bearings that mount the assemblies do not freely pivot around on the ball joint or there is evidence of a fire that came backward, e.g.; the plastic mounting seals are melted, the entire feed assembly, including the motor, should be replaced.
- If either auger motor moves freely up and down and the unit is not feeding, press “ON” to start the stove and watch the lock nut on each feed assembly for movement. Each assembly has a 5/16” square luck nut that holds the auger motor in place on each assembly. The lower auger motor should turn at 1RPM, counter-clockwise (looking at the shaft) all the time and the upper motor assembly should come on for 3-4 seconds then off for 16 seconds. If either lock nut isn’t spinning around, tighten it. If it’s tight in the assembly and isn’t turning, unplug the unit. Swap the leads going to each motor. Newer systems (after 2004) will be color coded. Put the yellow and black wires from the upper motor on the lower motor and put the purple wires from the lower motor on the upper motor. The lower motor should now be on 3-4 seconds and the upper motor should be constantly on. If the upper motor does not work with direct power from the lower leads and the lock nut is tight and it freely moves up and down, the upper auger motor needs to be replaced. If the upper motor works now and the lower auger motor isn’t working, there is a control/ sensor problem.
NOTE: ON MODELS MADE PRIOR TO 2004, ALL OF THE WORE LEADS ARE BLACK IN THE ENTRE WIRING SYSTEM. IF THIS IS YOUR STOVE, MARK LEADS WITH TAPE AND A MARKER PRIOR TO REMOVING THEM SO THAT YOU KNOW WHICH LEAD GOES WHERE. IF YOU GET CONFUSED, YOU CAN ALWAYS TRACE THE LEADS BACK TO THE CONTROL BOARD. TERMINALS ON THE CONTROLLER ARE MARKED. EACH COMPONENT HAS TWO LEADS, ONE WILL BE MARKED TO THE LEFT, SUCH AS IGN FOR IGNITER AND THE TERMINAL JUST TO THE RIGHT SIDE OF ANY MARKED TERMINAL IS THE COMMON FOR THE OTHER LEAD TO THE SAME COMPONENT.
- Put the leads back to normal. Purple leads on the lower motor and yellow/ black on the upper motor. The yellow wire for the upper auger motor runs directly back to the control board. The black wire for the upper auger motor runs from the controller to the hopper lid switch, from the lid switch back to the forward pressure switch and from the forward pressure switch to the auger motor. Models from 2004- mid-July 2008 did not use a hopper lid switch, ion this your stove go directly to troubleshooting the forward pressure switch.
Troubleshoot the hopper lid switch - Find the leads that come down from the hopper lid switch. One will go to the control board, the other goes to the forward pressure switch. Remove these wires from both the controller and the pressure switch. Using a DMM (digital multi-meter), test for continuity by clipping to each lead and depressing the button on the hopper lid switch. If your DMM sounds off, you have continuity and can reattach the leads. If it does not sound off, replace the hopper lid switch.
Troubleshoot the forward pressure switch - First, make sure the hole the pressure switch takes its reading from is not clogged. Using your owners manual, locate the 3/16” hole to the upper right side of the burn pot inside the firebox. Using a paperclip, poke into the hole and fish out anything that may be obstructing air flow. Plug the stove back in and press “ON”. If the upper motor now turns, problem solved. If not, you need to troubleshoot the switch.
There are three problems that a pressure switch can have. 1. The switch does not have continuity when the switch is closed No power flowing through it); 2. The switch does not stay closed once it has continuity (power cuts in and out); 3. The switch has poor or partial continuity (it has power but not enough).
The pressure switch Englander uses for these stoves is called a “differential pressure switch” and can work as a pressure switch or a pressure relay; it can turn power on or off AND can route power to one circuit or another, and it can do both at the same time. In this application, we are using it to turn a component off and on and will only be using 2 wires, but the switch can be wired wrong. We want this pressure switch to look for negative pressure to close and open contact so the switch needs to be wired NO (normally open) and the air hose needs to be on the gray side of the switch (negative pressure). Remove the leads and the air hose from the switch and remove the switch from the stove. To properly test the switch you will need the following: about 2 feet of air hose that can fit snugly on the hose flanges of the switch, a T connection for the hose to create a “branch”, a syringe to create suction and a magnehelic gauge or manometer that can measure .05” WC.
Place the hose on the gray side of the switch and the other end into the T connection. Cut some of the air hose and attach one side of the T to the syringe and the other side of the T goes to the gauge. NOTE: IF YOU ARE USING A MAGNEHELIC GAUGE, THE HIGH-PRESSURE SIDE OF THE GAUGE MUST TIE INTO THE BLACK PORT ON THE SWITCH OR BE SEALED OFF TO PREVENT LEAKAGE OF PRESSURE DURING TESTING.
Place the leads of your DMM on the NO and COM terminals of the switch. Using the syringe, draw air from the system until the DMM sounds off. Look at your reading on the gauge. It should be .05” WC +/- 10%. The DMM should stay sounding off if the switch can hold pressure. Depress the syringe and release pressure and the DMM should go silent. Draw on the syringe again, with the DMM sounding off, pick up the pressure switch and tip it back and forth. It should hold the pressure. If all of this checks out, the switch is good. If not replace the switch.
Part 2: Your pellet stove powers up and will turn itself off a few seconds later or, the stove starts up, achieves fire then abruptly shuts itself down.
This is usually a simple and easy fix and is very common. Directly behind the combustion blower is an air hose that detects negative pressure from created by the combustion blower coming on. If you are getting this error, follow this troubleshooting procedure.
- Verify that the combustion blower (exhaust blower) turns on when the power button is pressed. This is the blower located on the left side of the stove and you can hear and see it running through the circular steel cutout.
- If it running, verify that the vent is not obstructed. Go outside and put your hand in front of the vent, you will be able to feel the air coming out. If not, clean out the vent and find the obstruction and start again.
- If the motor works and the vent isn’t blocked, check the hose on the backside of the exhaust manifold. Remove the hose from the nipple. The hose is probably dry and cracked. Cut off a section of the hose up to the area that isn’t dry and reset the hose. This should solve the problem. If the hose isn’t long enough to make a cut, buy more hose.
- If you cut the hose or replaced the hose and the stove is still having problems, make sure the nipple the hose takes its reading from is clear of ash.
If everything checks out from here, you need to bench test the shutdown switch, looking for a tolerance exceeding 0.17” WC.
There are three problems that a pressure switch can have. 1. The switch does not have continuity when the switch is closed.; 2. The switch does not stay closed once it has continuity; 3. The switch has poor or partial continuity.
The pressure switch that is used is a “differential pressure switch” and can work as a pressure switch or a pressure relay. We are using it as a pressure switch, to turn a signal that is running through the switch to turn a component “off” or “on”. We want this pressure switch to look for negative pressure to close and open contact so the switch needs to be wired NO (normally open) and the air hose needs to be on the gray side of the switch (negative pressure). Remove the leads and the air hose from the switch and remove the switch from the stove. To properly test the switch you will need the following: about 2 feet of air hose that can fit snugly on the air flanges of the switch, a T connection for the hose to create a “branch”, a syringe to create suction and a magnehelic gauge or manometer that can measure .17” WC.
Place the hose on the gray side of the switch and the other end into the T connection. Cut the hose and attach one side of the T to the syringe and the other side of the T goes to the gauge.
NOTE: IF YOU ARE USING A MAGNEHELIC GAUGE, THE HIGH-PRESSURE SIDE OF THE GAUGE MUST TIE INTO THE BLACK PORT ON THE SWITCH OR BE SEALED OFF TO PREVENT LEAKAGE OF PRESSURE DURING TESTING.
Place the leads of your DMM on the NO and COM terminals of the switch. Using the syringe, draw air from the system until the DMM sounds off. Look at your reading on the gauge. It should be .17” WC +/- 10%. The DMM should stay sounding off if the switch can hold pressure. Depress the syringe and release pressure and the DMM should go silent. Draw on the syringe again, with the DMM sounding off, pick up the pressure switch and tip it back and forth. It should hold the pressure. If all of this checks out, the switch is good. If not replace the switch.
NOTE; THIS SWITCH CAN BE BYPASSED AT THE BOARD. FOLLOW THE LEADS BACK TO THE BOARD. EVERY CONTROL BOARD THAT LEAVES THE FACTORY HAS A JUMPER AND FUSE LOCATED ON THE OUTER SIDE WALL OF THE CONTROLLER UNDER A PIECE OF ALUMINUM TAPE. REMOVE THE SMALL BLACK JUMPER FROM THE TAPE AND INSERT IT OVER THE TWO JUMPER PINS LOCATED BETWEEN THE SHUT DOWN SWITCH WIRE LEADS AT THE BOARD. DO NOT OPERATE THE STOVE WITH THIS SWITCH JUMPED UNLESS YOU ARE THERE TO MONITOR IT. IF YOU HAVE A COMBUSTION BLOWER FAILURE AND THIS SWITCH IS BYPASSED, A HOUSE FIRE COULD RESULT. THIS JUMPER IS THERE FOR YOU TO TROUBLESHOOT THE STOVE AND BYPASS THE SWITCH IN AN EMERGENCY SITUATION ONLY AND THE STOVE SHOULD NEVER BE ALLOWED TO RUN WITH THIS SWITCH BYPASSED WITHOUT SOMEONE MONITORING IT.
Comments
Leave a comment