Install Instructions For Harman P35i & P35i-C Burn Pot Weldment: 1-10-774286
Important:
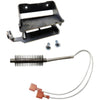
Before removing the old burn pot you will need to uninstall the ignitor cradle and disconnect the ignitor leads from the blue and yellow wires inside the neck of the burn pot. The removed ignitor and cradle can be reinstalled into the new burn pot once it is attached to the stove.
1.) Start by unplugging the insert and removing the ash pan cover from the base.
2.) Unclip the ash pan clips and remove the ash pan.
3.) Unclip the insert retainer clips (These clips hold the insert in the "Mounting Frame Assembly". Once released the insert can be pulled forward).
Important: The insert must be supported when being pulled from the Frame Assembly. This can be done using wooden blocks or one of Harman's Service Rail Kits (1-00-574354 or 1-00-8000041).
4.) The igniter cradle/holder is located in the burn pot. (To access the cradle you must loosen the two wing nuts securing the burn pot clean-out cover to the bottom of the pot. Once both wing nuts are loosened the cover plate can be removed).
5.) Remove the two 5/16" or 8mm screws that hold the igniter cradle inside the burn pot from the front of the stove. This will allow the cradle to drop down (Do not discard these screws).
6.) From the rear of the unit, locate the yellow and light blue wires for the igniter at the point where they pass through the neck of the burn pot into the rear of the stove, it is directly under the auger (On some units, there may be a small rubber grommet or a dab of high temp silicone where the ignitor wires transition to the back of the unit.)
7.) In this area you should notice extra wire looped together (Likely, this excess wire will be secured in position with a zip tie). This extra wire needs to be freed up so that the disconnects can be pulled forward and disconnected from the neck of the burn pot. This can be done by carefully cutting the zip tie and gently pushing about 12" of the yellow and light blue wire into the cavity of the stove where the ignitor is located.
8.) Once you confirm the extra blue and yellow wire is fed forward into the neck of the burn pot, the leads coming from the ignitor can be disconnected (In the neck of the burn pot) and the igniter and bracket can be removed.
9.) Spray the 4 nuts around the neck of the burn pot with penetrating oil and let it set.
10.) Remove the 4 nuts holding the burn pot to the rear of the stove (Take care not to lose the washers during this step).
11.) Remove the old gasket and install a replacement (It is recommended that a new gasket be used anytime the burn pot is replaced).
12.) Position the new burn pot, slide the previously removed washers back into position, and hand tighten each nut.
13.) Once all four nuts are snug by hand, begin to evenly tighten each with a wrench or socket (Tightening in a crisscross pattern works well and will help prevent overtightening on one particular corner of the burn pot).
14.) After the burn pot is fastened in place the ignitor can be repositioned into the cradle, the cradle can be reattached to the pot, the ignitor leads can be reattached to the blue/yellow wires in the neck of the burn pot and the burn pot clean out cover can be reinstalled. (Remember to pull the excess wire back in the rear of the unit and zip-tie it in a safe spot).
15.) Slide the insert back into position and secure the retainer clips.
16.) Reinstall the ash pan and secure the ash pan retainer clips.
17.)Reposition the ash pan cover.