Product title:
Product availability:
In Stock
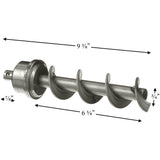
Harman Feed Auger Shaft Assembly: 3-50-00565-AMP
Product price:
$89.99
A $33.50 Savings over the OEM
Product SKU ! 3-50-00565-AMP
Product MPN ! 3-50-00565
Bullet point features
- Aftermarket Part Learn more about the difference between OEM and AMP parts
- For Stoves Made 2009 and After
- Length: 9 3/8"
- Ships FREE with orders over $99
- 30-Day Hassle Free Returns
- 90 Day Warranty Included
- Same Day Shipping On Most Items!*
- See Complete Description
You may also want to consider...

Harman Emergency Repair Kit With Control Board: 1-00-05886